
quilt how-to
alright, so here is the tutorial for my go-to quilt. just after snapping the first photo, yesterday became, what seemed like, the darkest day of the year. . . so the lighting is bad, but i think you'll get the gist of what i'm saying all the same. . .
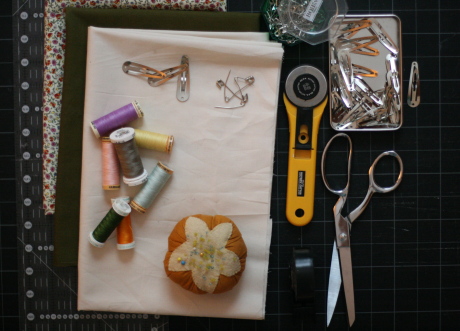
materials:
fabric. 100% cotton. two solids for front and back. third fabric for binding, can be patterned or solid, you choose. the beauty of this quilt really lies in its simplicity and flexibility.
batting. i only use 100% cotton, mid or thinnest loft.
thread. lots of thread in as many (or as few) colors as you choose.
tools. rotary cutter, cutting mat, masking tape, quilting pins, binding clips.
first. cut fabric to desired sizes. for a quilt size guide, see here. depending on the size of the quilt, you may need to do some piecing. be sure to leave batting just bigger than front and back pieces.
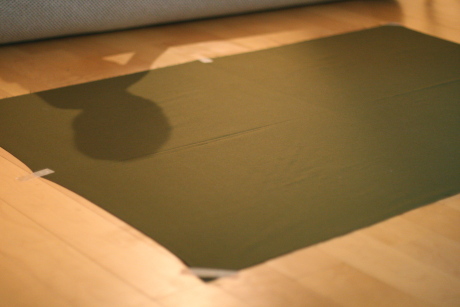
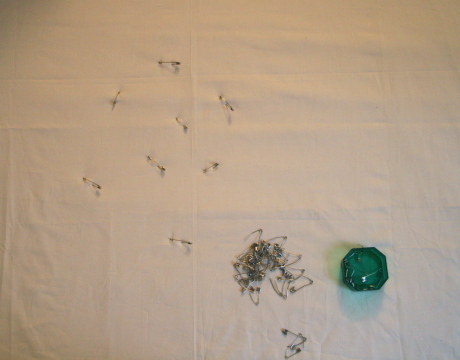
second. baste the quilt. very important to do a good job basting so there is no unfortunate pinching or clumping of fabric while quilting it on the machine. usually best to do this while kids are in bed since their little feet cannot resist dancing (or crawling) on large pieces of fabric stretched on the floor. begin by taping the backing to the floor as taut as possible. don't be afraid to pull. gently lay and smooth batting over taped layer. follow with "front" of quilt. smooth out and get fabric as flat as possible. starting in the center, use quilting pins (essentially safety pins with a bent arm) to secure the the three layers together. work your way out in a circle, smoothing and flattening the "quilt sandwich" as you go. the fabric should be totally smooth. be sure to go all the way to the edges.
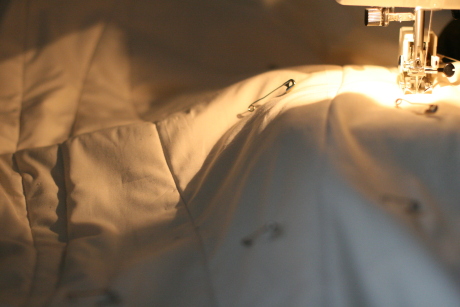
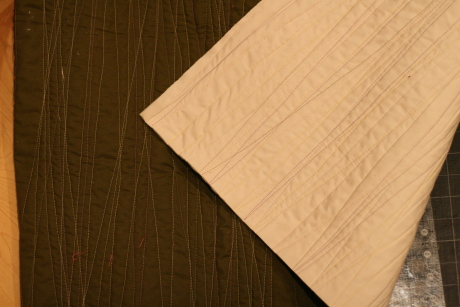
third. machine quilt. the fun and most time consuming part. with a walking foot on your machine, begin the quilting at one edge of your quilt. (quilt "parallel" to the shorter side, easier to manage). quilt at very a slight diagonal. removing basting pins as you go (don't sew over them, or let your daughter take control of the pedal for you while she also watches a show about mermaids. . . you'll regret it). when you reach the opposite edge of the quilt (going beyond edge of fabric, into the batting a bit) lift presser foot but keep needle in "down" position. rotate the blanket and quilt to the opposite edge at a slight angle once again. repeat until you quilted the length of the quilt. your quilt will look something like this:
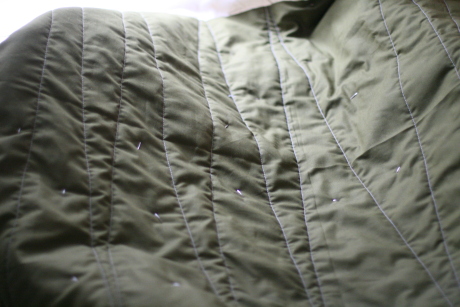
switching out thread colors (or keeping the same) repeat entire process again and again and again until you are satisfied with the amount of quilting. this uses a lot of thread but looks really great. just be sure to go slowly, feed quilt through at an even pace and watch that the fabric doesn't get gathered or bunched while quilting. the walking foot helps a ton with this, as does proper basting, but keep watch just in case. if some of your lines aren't perfect, don't worry, the other quilting lines will distract, and washing and drying does wonders for covering up small mistakes.
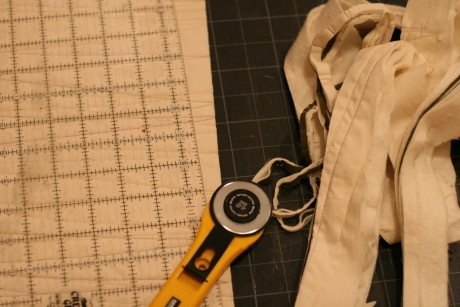
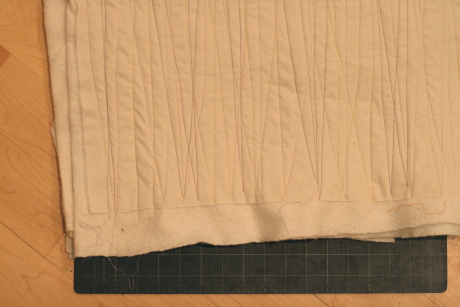
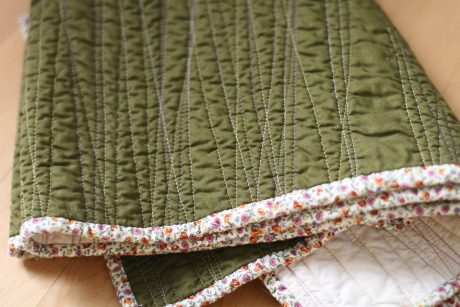
fourth. trim quilt. to get ready for binding, the quilt sandwich needs to be "squared" and trimmed. i like to trim two sides at once, folding it in half before evening it up and trimming. clear ruler and rotary cutter. check that all layers go to the very edge after trimming.
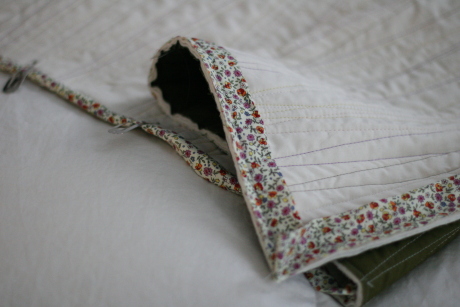
fifth. bind quilt. i use the "double fold mitered corner" binding method. the same method taught in denyse schmidt quilts book and that was taught at my quilting class at purl. i love this method, and it deserves it's own tutorial. luckily, there are a few out there. hand stitching the binding is ideal, but if you are short on time, go ahead and use your machine to stitch the binding down. don't feel bad, it will still look great. (especially in the light of a much brighter day).
sixth. after binding and trimming all loose threads, throw your quilt into the washer and dryer. pull it out, admire it, wrap it for a gift or wrap yourself up inside. feel great. you just made a quilt, and it's modern and cool and probably took you less than 10 hours.
 123 Comments
Reader Comments (123)
your blog and your girls are fantastic! thank you for sharing your fun & creative ideas! i've never made a quilt, but i'm starting this project today as a father's day gift for my husband. hope i can pull it off! :) thanks again! have a wonderful weekend.
-Linette
I just finished a small quilt based on your tutorial. Thanks for the great idea!
I blogged about it here:
http://sewandsox.blogspot.com/2009/06/dank.html
Such an excellent tutorial! You actually inspired me to make my first (very basic) quilt - and I'm hooked! Thanks so much for sharing in such a careful and easy to understand way.
(Mine's up at http://bit.ly/aVNzn)
Also, I just adore your whole blog - when I found it, I spent an embarrassingly long time trawling through your archives. You are inspirational.
I made a baby quilt last night and it turned out great! It took me about 6 hours total. Thank you SOOO much!!
Liz
i just LOVE your blog!! you are so inspiring in so many ways. i love all of your pics, projects, mom activities and lease on life. thank you for always being such a blessing for a mom who is often caught at home. i copied this blanket a few times and just thought i would let you know i am sending people here for your tutorial left and right!! you can find it lullabylubbock.blogspot.com/2009/09/two-birthday-presents-for-michael.html and lullabylubbock.blogspot.com/2009/09/bens-blanket.html. thank you so much!!! keep up the fantastic work!!!
Safety pins! Hah! I never would have thought of that. I've been wondering for years how to machine quilt (all my mother in law ever taught me was hand stitching and tieing -how do you spell that word?-) Now I know how to do it the other way! If I hadn't just worn my kids out by spending half the day in front of my machine I'd go down there right now and start playing.
Thanks!
Hi! Just wanted to thank you for the tutorial and tell you I made a toy basket using this technique
Here is a photo of it, if you want to see it
http://www.flickr.com/photos/34299186@N00/4174533303/
I LOVE how it turned out!
Thanks again
i'm a brand new quilter, and after looking at hundreds of quilts online, this will be my first. quick question: do you pre-wash your fabric?
thank you.
Thank you so much for sharing how to do this. The instructions were so easy and the results were even better than I had expected. I just posted my version here http://sisterswithflair.blogspot.com/
My first quilt! Thank you so much for the directions! I made baby blanket for my friends new little one and I'm so happy with it! Thank you thank you thank you!
Specialists tell that credit loans help people to live their own way, because they can feel free to buy needed goods. Furthermore, a lot of banks present auto loan for young and old people.
wow! i absolutely love this! so simple but do gorgeous! i'm totally going to make a quilt like that! thanks for the inspiration:)
Thanks so much for the tutorial .. I used it make a snuggly quilt for a baby boy and it turned out wonderfully!
do you like to make more money?
do you like to make money at home?
do you like to make $428 one day?
CLICK HERE :moneymadeeasyongoogle.com
i made one :)
http://lavoietimesthree.blogspot.com/2010/05/baby-stuff.html
thanks for the idea!
Can this be done to a 90 x 90 inch quilt? I wonder if all that fabric will fit on the sewing machine.
I really want to try this.
I am so happy right now! I started one of these last night! A friend of mine is having a little bebe and I'm making her a blanket! This is perfect! I might need to make one more as this is kind of looking like my practice quilt. :)
But it's still so fun!
T H A N K Y O U!
katie! thanks so much for this post and for your blog! i love, love, love it! i have recently started sewing (self teaching though-planning on taking a class soon) and i made you quilt! check it out on my blog! i am so proud! thanks again!
http://12thstreetproduction.blogspot.com/2011/02/park-blanket.html
P.S...we must be neighbors...
Thank you so much for this tutorial!! I've kept it bookmarked for a while now and finally sat down and made my own. LOVE.IT. Come back!!
I made one of these a few weeks ago and am working on another one!
http://www.mamamelcrafts.com/2011/04/2011-thing-week-13-simple-baby-quilt.html
tiffany --One may fall in love with many people during the lifetime.-replica Burberry Canvas Shoes
Super excited to try this!!! It's so cute and the color combos are endless!!
I just wanted to say thanks for your hugely inspirational tutorial, I knew I had to make it as soon as I saw it! Holly, London, England.
I know you posted this a while ago, but I am just seeing it - and I love your quilting! Thanks for sharing your method!
Would it be possible for you to post a picture of the quilt unfolded - would love to see the quilting across the width of the quilt??
If not that's ok - still going to try one like this :-)