
tutorial: flower collar
so, i had a birthday yesterday. in honor of this new year and decade of my life (which i think should be pretty good), i give you the gift of a previously promised and overdue tutorial. i'm generous now that i'm in my thirties.
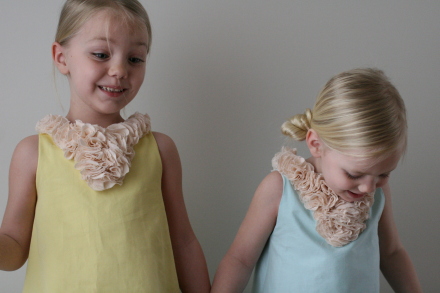
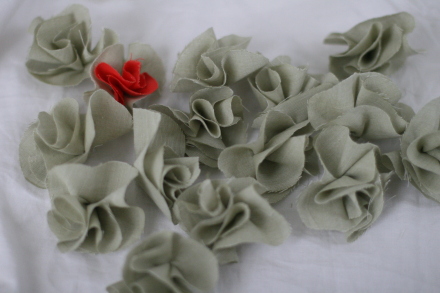
here we go. how to make this collar (or something like it):
you need: lightweight fabric (i used shot cotton on the easter dresses and will be using it, in a different color, for the tutorial today), scissors, needle, thread, thimble. that's it.
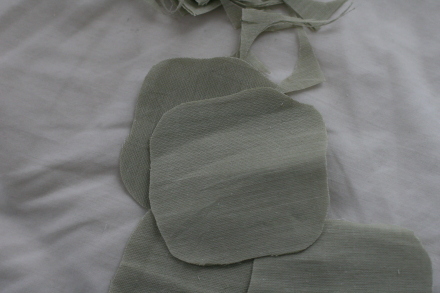
:: with fabric folded, cut a strip. the size varies depending on the size of flowers you want in the end, here i cut a 3" strip. keeping fabric folded, cut strip into squares. (you do not need to be exact with any of this).
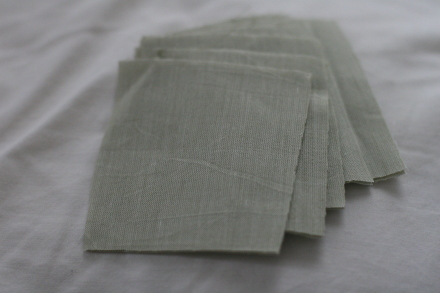
:: trim the corners off the squares, making a flowery square. these "squares", with two layers each, will be used to make one flower.
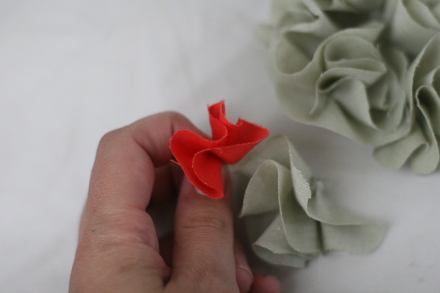
:: making the individual flowers. pinch and gather first layer of "square" in the middle so it looks (wow, you're going to get tired of this word) flowery.
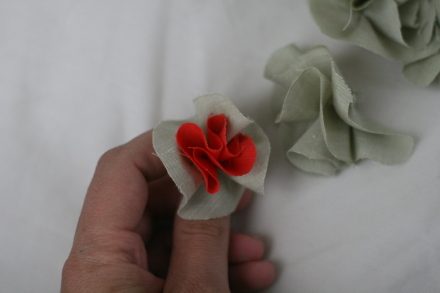
:: while holding the middle of the first layer secure, bring second layer to it, gather around the pinched part. move and gather fabric until it looks good.
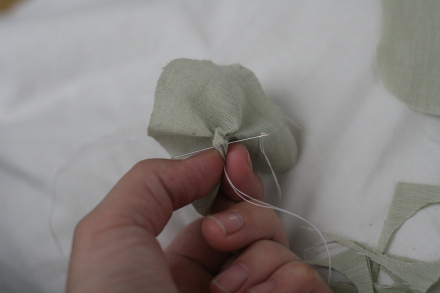
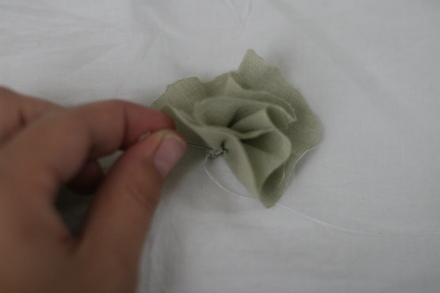
:: stitch the flower through the pinched stem to hold it all in place. i usually run the needle and thread through four times or so, just enough that all the gathering/ruffling is secured. knot and cut thread.
::repeat many many times. you'll need a lot of these flowers.
:: attach flowers to fabric (shirt, dress or whatever you're making flowery) one at a time. if you have children who, like mine, are really good at pulling on things, you'll want to secure each flower very well with several stitches before moving to stitch on the next. this is where the thimble comes in handy. pushing that needle through again and again gets rough on the fingers.
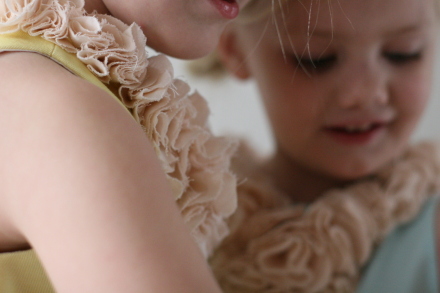
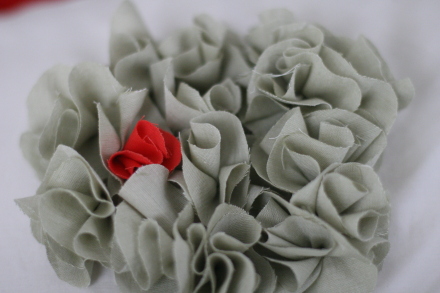
:: depending on the look you want, you can either pack them really tight (i did this for the easter dresses) or you can keep it a little bit looser and let each individual flower show a bit more. here i have 15 flowers. the first picture shows them tight, the second a bit looser. great either way.

that's it! just stitch them on in the shape you want and you're done. so easy, right? just plan on spending a little time on it. it's one of those great projects to do while listening to this american life. especially act one of this episode. break-ups, phil collins and starlee kine. so good.
...
also, there were some questions about the specifics of the easter dresses. unfortunately, other than the flowers (kaffee fassett shot cotton in blush) i don't know what the fabrics are, exactly. ruthie's light blue is either kona or p+b color spectrum while eve's yellow dress is a lovely cotton twill from my stash.
 102 Comments
Reader Comments (102)
So pretty. I love the garland idea in one of the earlier comments. I'm moving into a super cute but teeny tiny studio in the next couple of weeks and will likely find some way to use this - maybe inside a big frame in place of a headboard? Ooh, I'm getting excited at the possibilities!
Wow, this is GORGEOUS! I can't wait to give it a shot. And I'd love to link to it if you didn't mind!
Gorgeous dresses, and happy birthday to you! My thirties have been excellent so far, and I can't believe I have only one more year left in them, so I hope the forties get even better. These collars remind me of what they wore in Elizabethan times--thanks for the inspiration!
Hmmm...I'm picturing a long flowing skirt with a design in these flowers. Wonder how heavy that would get? I like skirts to be light and flowing, but I like the depth it would give.
Hmmmm...would you maybe zigzag the edges to prevent ravelling if this is something you would be wearing frequently?
Thank you for the great tutorial, and happy birthday! I found your blog via Whip Up, and I am in love! Beautiful photos, beautiful projects and beautiful children - I can't wait to wade through all of your archived posts.
I'm totally in love with your blog. I can NOT wait to try to this. Thank you for the tutorial.
Oh and happy birthday. I remember back in my 20s someone telling me that 30 felt more centered, more true to oneself. I have to say now, being in my 30s, it's definitely true. Enjoy!
that is so amazing! I can't wait to try this!
What a beautiful tutorial you've made. I think it would a perfect addition to instructables.com. We're the largest DIY website, making it a great way to drive traffic back to your own site! Posting is easy, especially since you already have great pictures and copy. Once you've posted, let me know and I'll make sure you get featured on the front page!
Best.
Sarah
this tutorial makes me want... no, need!, a little girl. for now, I'll have to settle for spoiling my nieces with little flowery dresses.
gorgeous, just gorgeous. I'll be linking from my blog. :)
kirstin
Simply gorgeous! Oh I love it! I'm linking so I can do this someday!
This is so pretty! I am wondering if the edges of the flowers become unravelled when the dresses are washed. (i'm thinking that it would take my daughters all of five minutes to spill something on these lovely things.) I saw a similar effect around the collars and button bands of cardigans in the current J Crew catalog. Thanks for the tutorial, and...Happy Birthday!
Gorgeous! I've been trying to make these for the last few weeks, but my fingers are killing me and I finally gave up! I think maybe my fabric is too thick. Now that I've read your tutorial, I'll try again with something lighter.
so pretty! and al ovely blog (just found you via Greedy Girl).
where did you find your shot cotton??
xo
Kelly
I absolutely adore your tutorial, can I link it to my blog, I would really apreciate it, www.kireei.com
Oh my, I am so inspired. Your work is amazing. Now I really want to get my sewing machine out. Thanks for sharing this.
cris-
yes, of course. link away!!
kelly-
i got my shot cotton at purl patchwork (they're online at purlsoho.com)
thanks everyone- you need to show me what you do with this!!
Okay, I was inspired by the little flowers and had a Hat Party this weekend, so I made a hat! Come look! (promise to take a picture once I've got it on!) -Siiri
www.decorazzi.blogspot.com
these look absolutely awesum i will be making sum 4 my daughters wedding
do these hold up well to washing?
uhhh, I love your sewing projects! I just packed my machine in a POD and sent it to Boston. Your blog makes me miss it so much. Thanks for the instructions! I will be excited to see it and try some of these little flowers soon.
Your girls' dresses are so simple and beautiful. The colors are so soft and lovely. Thanks for sharing about the collars!
Where have you been my whole life! Love this blog! Love it!
Oh my goodness....this collar is adorable. I have two girls and one boy also. My girls would look adorable in this. Thanks for sharing the tutorial. If I attempt to make it, I'll email you pics. Thanks so much. Terri
theglitterednest.typepad.com
Just wanted you to know I linked to this on my weekly link roundup. Very cute!
Wow, I am amazed by your creativity! I just stumbled across your blog from another one and I LOVE it! Those dresses are way too cute... and are those your girls? They are beyond adorable.