Entries in quick projects (9)

Tuesday
Apr072009

from the archives: shoe money

one day, back when we were babies and had lived in new york for about two months, i came home from work to find a surprise on the kitchen table.

chip's parents had just come and gone for their first visit to see us in our new city. while here they outfitted their fledglings with new coats and, for chip, a pair of shoes. their sweetness and generosity compelled them to leave money behind for me, for my own pair of shoes since my working had gotten in the way of the shopping. chip's amazing presentation skills (and the flexibility of his graduate program in painting) compelled him to do this with that money left behind for me: 

these pictures carry a lot of memories- so many sweet, and a few hard- from that first year of marriage, that first year of brooklyn. but even more, they make me realize that we need more of this in our life. more making the mundane (if you can call money for shoes mundane) something special and celebratory. not overly complicated, but simple. chip is so so good at this. two pieces of paper, some ribbon and rubberbands and my return home from another day of work at an investment firm where i never felt comfortable was pure joy. so much better than a bill just lying on the table (although i certainly wouldn't have complained about that). this is what i'm after with raising my children. and with living life. making the normal, or even less-than-normal things something more. taking the time to celebrate our life. purely and simply, everyday.


Tuesday
Mar242009

boys have birthdays too

and eve knows that because her daddy has a birthday and she remembers when charlie came out of my tummy, and that was his first birthday ever. but he was zero, which is a little funny. 

so, because they have them too and because i believe in the glory of two-in-one, we now celebrate birthdays with this banner. one side for the girls. one side for the boys. or if the kids decide to break free of the gender-specific color regime, they get to choose whichever side they like the best. either way, this thing is going to be around forever. i love thinking of hanging the banner up 10 years from now when these exact shades and designs are decidedly out of fashion and the kids think it's so ugly, but love it still. because it is tradition, and you can't help but love tradition. 

if you don't already have your own and are thinking of the awesomeness of reversibility and segregating colors, this is a fun project. great for using up fabric already in your stash, in fact, i like this so much more knowing i used only what was on hand. and even though it sat in the "almost finished" pile nearly a year, it really is quick. especially if you sew the triangles, wrong sides together, and use pinking shears on the edges rather than spending the time turning each right side out, which i'm happy with, but am not sure was worth it when pinked edges are fun too. and faster. 

. . .

things are most likely going to be calm around here for the next week or so. i've got my hands full watching over little charlie as he recovers from a terrible burn on his left hand. my chest is tight with guilt just thinking about his sad bandaged hand. i will never doubt his determination or strength again. nor will i assume that trains and a chair barrier are enough to distract him from the heat pipe of his desire while i wash my face. as i was waiting with him in cornell's burn unit, clowns came in to cheer the room up. people laughed. a lot. but i couldn't look at them, it was too sweet and right and made me want to cry for little charlie, that we were in a place where clowns come to cheer up the sad and broken. but i was so grateful all the same. people are awesome. 

(and so were your treat suggestions! it's almost scary how many delicious things there are to shove in my mouth. . . i haven't stopped dipping my apples in honey since jackie suggested it and i can't wait to get going on all the other favorites. but slowly. because charlie and his paw need more attention than my belly. . .) 

Thursday
Feb192009

monday evening

after eight years in new york it finally happened. we got mugged. it was different than i imagined. i never imagined it happening in the daylight. i never imagined a mugger in his 40s. and i never imagined it happening while my kids played games around our feet.

i stared at his painted-on beard, at the upper lip filling the gaps where his teeth should have been, at his long brown coat, at the half smoked cigarette in his left hand as his right held the partially concealed revolver. he needed money. he had kids. he loved kids. our kids were beautiful. he didn't want to hurt them. he didn't want to shoot us. but he had $900 rent due. he needed $900. he wouldn't go to a shelter. he wouldn't put his kids on the street. he needed $900. please. he didn't want to kill our kids. he loves kids. 

i searched my pockets. i had $0.75, maybe $0.80. i had a $20 watch. i took it off and handed it over. he didn't want change. he needed $900. what were we going to do for him? he had no choice. i fished some more. another quarter. chip shifted charlie and pulled out his wallet. i stared at that beard. was it shoe polish? was it a disguise or just to look good? was that gun real? it looked too small to be real. i was calm. i calmly told him to chill out. but i was also irritated, really irritated. chip handed over the wallet, empty of cash, full of credit cards and id's. i wanted the id. he would mail it to us. i wanted to get it now, i didn't think he didn't need my husband's license. he'd put it in the mail. i persisted. he raised his voice. don't push it, lady. i didn't. my hands went up. he told us to go to our apartment. "go inside mama." he didn't want to hurt no one. he just wanted to go. we just wanted it to be over. it finally was. 

i went inside to cancel credit cards. chip pulled out his phone to call 911. "no! you only call 911 if there's an emergency!" eve cried. they had no idea what had just happened as they giggled and played and we talked with the man in the doorway.

i always imagined being scared, too scared to scream, too scared to think. but i wasn't. strangely, i was not scared at all, only irritated. maybe because chip was at my side or maybe because the man kept shifting his body so the girls wouldn't see the gun. maybe because he seemed affected, almost tortured when he first saw eve's face. maybe i believed him. or maybe i've been in new york long enough. or maybe i just couldn't believe what was happening, that his man was mugging a family of five, my family of five. 

police came, chip went to the precinct, detectives were assigned. i dreamt about him all night and awoke remembering every detail of his face. i left to the suburbs for a happily pre-planned overnight stay. chip got a call at work. a kind stranger found his wallet and called his credit card companies to contact him. everything was there, except the metro card and his driver's license. maybe the mugger put it in the mail after all. or maybe he took it out to spite me. . . who knows. 

how's that for heavy fare? but, after the many many talks with the girls about the choices we make, taking responsibility for those choices and controlling our emotions, we're back to our usual business. . . like making a scarf in commemoration of our group mugging experience. one four inch wide strip cut from black and white striped knit and wrapped around neck. not one stitch of sewing. i'm certain i made this in less time than the mugging lasted. . and don't worry, the girls don't know what this is "in memory of," that's my little secret. . .

Sunday
Feb082009

hearts in their hair


because they are little girls who love to talk in high voices and wear high shoes. and because no matter how foul the mood brewing between their little eyebrows, when given a heart- any heart- their world becomes warm and bright and magical again. ponies, unicorns and princesses return and they are back to the work of rescuing us all from the ever present danger of hot lava.

and because if you're going to wear a garland of bright pink felt circles and hearts in your hair, this is the week to do it, right?

++

i took pictures of the girls after writing the above. turns out hearts on the head are not the cure for everything, especially for a mom who won't stop taking pictures of girls who have better things to do. . . 

Monday
Jan262009

quilt how-to

alright, so here is the tutorial for my go-to quilt. just after snapping the first photo, yesterday became, what seemed like, the darkest day of the year. . . so the lighting is bad, but i think you'll get the gist of what i'm saying all the same. . . 


materials: 

fabric. 100% cotton. two solids for front and back. third fabric for binding, can be patterned or solid, you choose. the beauty of this quilt really lies in its simplicity and flexibility. 

batting. i only use 100% cotton, mid or thinnest loft. 

thread. lots of thread in as many (or as few) colors as you choose. 

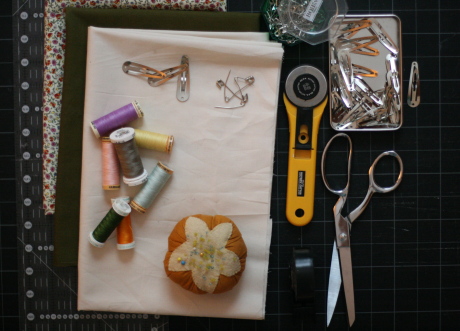
tools. rotary cutter, cutting mat, masking tape, quilting pins, binding clips. 


first. cut fabric to desired sizes. for a quilt size guide, see here. depending on the size of the quilt, you may need to do some piecing. be sure to leave batting just bigger than front and back pieces.


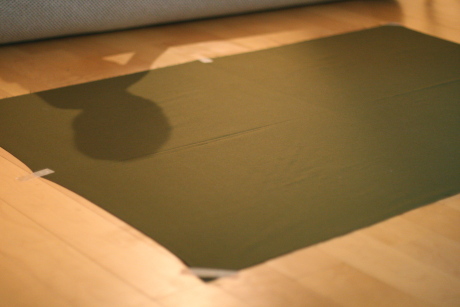
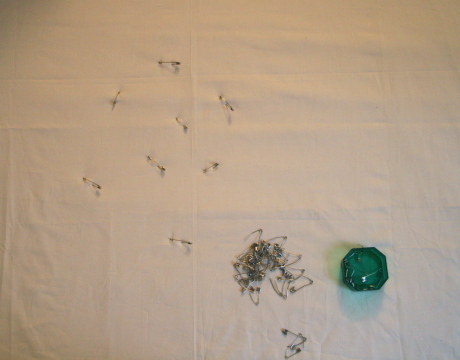
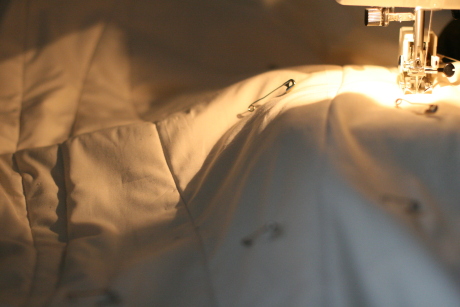
second. baste the quilt. very important to do a good job basting so there is no unfortunate pinching or clumping of fabric while quilting it on the machine. usually best to do this while kids are in bed since their little feet cannot resist dancing (or crawling) on large pieces of fabric stretched on the floor. begin by taping the backing to the floor as taut as possible. don't be afraid to pull. gently lay and smooth batting over taped layer. follow with "front" of quilt. smooth out and get fabric as flat as possible. starting in the center, use quilting pins (essentially safety pins with a bent arm) to secure the the three layers together.  work your way out in a circle, smoothing and flattening the "quilt sandwich" as you go. the fabric should be totally smooth. be sure to go all the way to the edges.


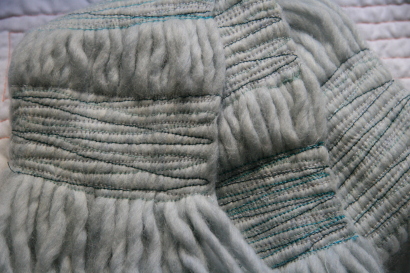
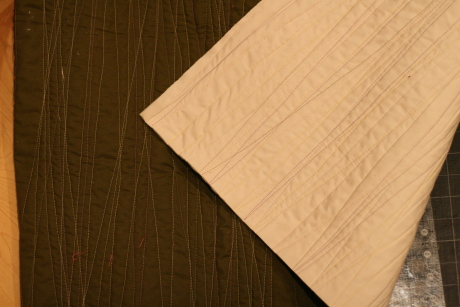
third. machine quilt. the fun and most time consuming part. with a walking foot on your machine, begin the quilting at one edge of your quilt. (quilt "parallel" to the shorter side, easier to manage). quilt at very a slight diagonal. removing basting pins as you go (don't sew over them, or let your daughter take control of the pedal for you while she also watches a show about mermaids. . . you'll regret it). when you reach the opposite edge of the quilt (going beyond edge of fabric, into the batting a bit) lift presser foot but keep needle in "down" position. rotate the blanket and quilt to the opposite edge at a slight angle once again. repeat until you quilted the length of the quilt. your quilt will look something like this:

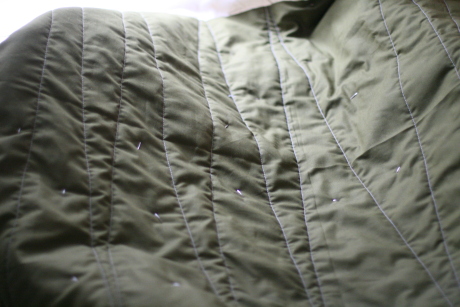
switching out thread colors (or keeping the same) repeat entire process again and again and again until you are satisfied with the amount of quilting. this uses a lot of thread but looks really great. just be sure to go slowly, feed quilt through at an even pace and watch that the fabric doesn't get gathered or bunched while quilting. the walking foot helps a ton with this, as does proper basting, but keep watch just in case. if some of your lines aren't perfect, don't worry, the other quilting lines will distract, and washing and drying does wonders for covering up small mistakes. 


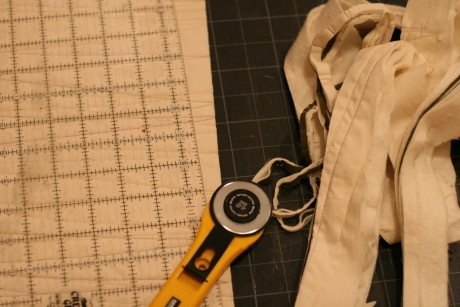
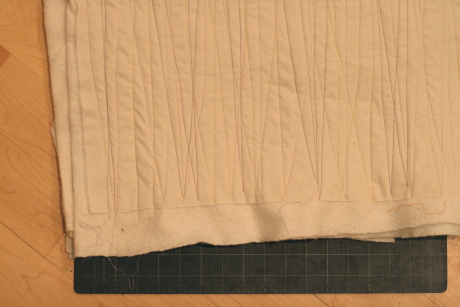
fourth. trim quilt. to get ready for binding, the quilt sandwich needs to be "squared" and trimmed. i like to trim two sides at once, folding it in half before evening it up and trimming. clear ruler and rotary cutter. check that all layers go to the very edge after trimming. 

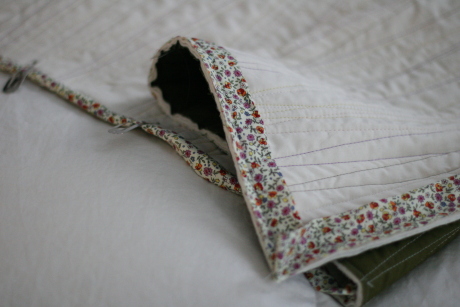
fifth. bind quilt. i use the "double fold mitered corner" binding method. the same method taught in denyse schmidt quilts book and that was taught at my quilting class at purl. i love this method, and it deserves it's own tutorial. luckily, there are a few out there. hand stitching the binding is ideal, but if you are short on time, go ahead and use your machine to stitch the binding down. don't feel bad, it will still look great. (especially in the light of a much brighter day).

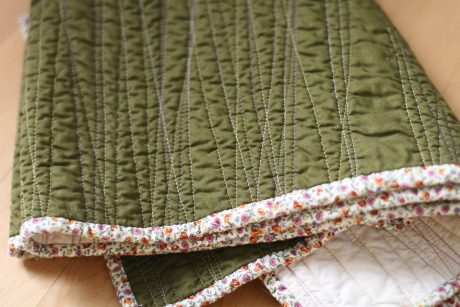
sixth. after binding and trimming all loose threads, throw your quilt into the washer and dryer. pull it out, admire it, wrap it for a gift or wrap yourself up inside. feel great. you just made a quilt, and it's modern and cool and probably took you less than 10 hours.  

Tuesday
Dec022008

getting colder

the weather has officially shifted. we can no longer walk the streets of brooklyn unbundled without seriously regretting the decision. so, the coats and hats and gloves have come out of storage and onto the big and little bodies around here. a few days into the cold, eve began requesting a scarf. ruth soon joined in. after two weeks of being reminded (scolded?) by my daughters i got to work making the scarves, in the laziest ways possible. instructions below:

scarf #1: find abandoned, half-finished scarf wadded up in the bottom corner of yarn/knitting bag. stick needles in one last time to cast off properly. sew on largest button you have and fasten around daughter's neck. 


scarf #2. think back to when you made a scarf for your sister-in-law four christmases ago. recycle exact same idea. get a bunch of yarn, cut into strands at desired length. holding all strands together, sew back and forth at desired intervals with whatever color(s) of thread you have near your sewing machine. wrap around daughter's neck.

feel really good about yourself. you might have been lazy, but you've just made scarves two scarves in less than an hour. and that's something. 


Sunday
Feb102008

baby quilt binge

an unfinished project that has been haunting me for nearly a year and a baby shower prompted last week's binge.

Img_2029Img_2030

finally finished this quilt made of squares i took from my mom. except for the white and red polka dot, these are all fabrics from my childhood. i had it nearly completed 10 months ago but hated the way i quilted and bound it, so it got stuck in a corner. last week i picked out all the quilting, pulled off the binding and did it for the second and final time. we're all feeling much better about it now.


Img_2018_2Img_2020

started making this quilt for a friend's baby girl. tying the quilt using a little hoop took an annoying amount of time i wasn't planning on. by the time i finished tying i was sick of it, so it was put to the side and finished a few days later. in case you can't see through the folded up quilt to know what the whole thing looks like; the front is a solid piece of the little girls fabric while the back is what you see (white, yellow, striped) plus another big piece of the yellow. the polka dot binding was the reject from the first quilt. i love not wasting.


Img_1749Img_1753

after i lost interest in the girl quilt i moved on to this one. a one-night project is so satisfying (even if it is my old standby) and especially fast when it is in little little baby proportions. a picture of the tiny blanket (30x34") unfolded made it look like a placemat. but babies are small and the very pregnant mom was happy. the opposite side is nice unbleached muslin

and although our home doesn't really need another blanket of any size floating around, i'm looking forward to the next one. hopefully for upcoming boy, who is still very very nameless.

Sunday
Jul152007

baby quilt

a good baby quilt is one of my favorite things. to prove it, i have about 15 crammed in various spots in our 650 square feet, with plans (secret, naturally) of accumulating more.

considering my own love, i assume everyone else feels the same. and if they don't, i think they should. (i really am a good american). so, for a new friend's baby shower this past weekend i made a simple little quilt for her up-coming baby boy. i'm always nervous when i make things for boys- are my color choices too girly? is this fabric weird for a boy? i feel like i have no real gauge on the whole thing. but, things seemed to work out. in fact, i almost kept it for myself. but, i'm trying to be less selfish (and i had no back-up gift) so i wrapped it with a ribbon and we were off. it went over well with the preggers mom and everyone ooed enough to make me feel good and special. win win.

Img_7163Img_7160

the front is a cowboy print i picked up on my last trip to oregon, the back (my favorite) is seersucker with a bright red, and the binding is the really great cursive handwriting fabric by moda ("mrs. nelson's 2nd grade") and a little patch of orange for fun. blurry close up shot to see said edging:

Img_7164_2

it felt good to make another quilt, especially such a quick one. if i was smart i'd start working on the girls' christmas quilts now. . . but that's not going to happen, this will: i'll procrastinate, get over-ambitious and then be freaking out trying to finish them the night before christmas. i won't. so then i'll turn them into valentine's day gifts, pretending that was my plan all along. . .

Friday
May182007

quick

tuesday night i taught the art of freezer paper transfers to a group of women at church. such a fun project. friends and family, if you don't know how to do this, we should talk. it is so so easy and a great option for gifts- particularly for the babes. in fact, if you are having a baby anytime soon, you now know what's most likely coming your way . . .

here are some examples i made for the ladies to see:

Freezerpaper_3

and here are two of them in action:

Freezerpt

all you need is some freezer paper, an x-acto knife, a shape, a shirt/onesie, fabric paint, an iron and you are on your way. . .

i first did freezer paper transfers last year. for father's day i made a silhouette of the girls and painted ruth's on one t-shirt of chip's and eve's on another. i won't be shy, i think the idea is pure gold. you should do it. better than a tie, right? although if i could figure out how to make him a tie. . . or maybe it's time to enact my secret plans and make him the bright yellow sweatsuit?. . . could be the best father's day known to man . . .

*if any of you do plan to try this out freezer paper transfers, do a little research online or talk to me, there are a couple things you need to do to prevent total frustration.

UPDATE: see here for a solid tutorial with all necessary details included!